Thursday, April 17, 2014

Animal Classification and Habitats Unit

 
http://www.teacherspayteachers.com/Product/Animal-Classification-Habitat-Unit-With-Student-RecordingResponse-Booklets-1210136
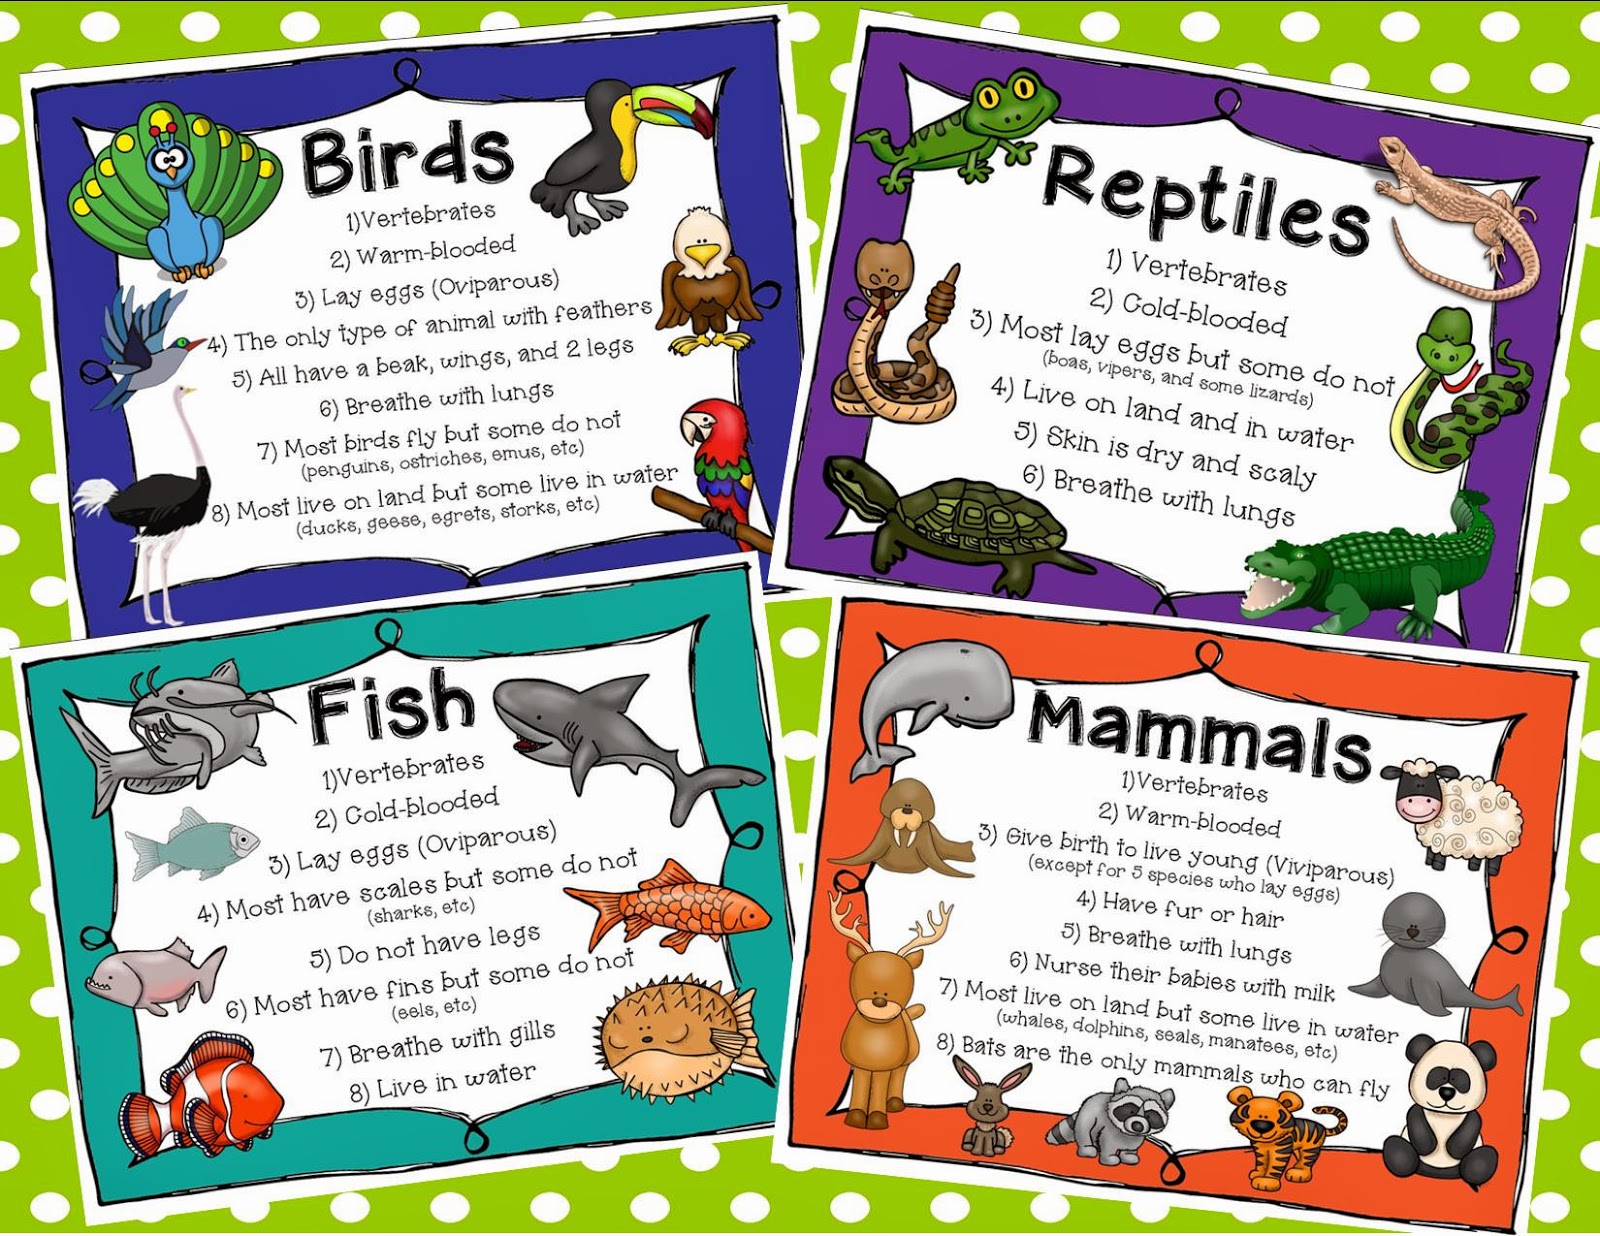
Animal Group Posters from my Animal Classification/Habitats Unit

     Okay, so I seriously put off writing this post all day because I'm totally embarassed by how long it's been since I last wrote a blog post......whoops.  I think I may have set a new record for blog neglect. But it's all good because it is SPRING BREAK baby, and I finally have some time to blog!!  I seriously don't know what I would have done if Spring Break had not come this week......it was SO late this year and me and my kiddos were SO ready for a break.  I love my little ones, but you all know how it gets when it's been too long without a break....whew!  Anyway, I started off my break by skipping town and heading down to Atlanta to see my sister.  It was great not being home, because when I had free time there was nothing I could do! And I never get to just do nothing. You know, when you're at home and you have a moment of free time you feel like you need to be DOING something....laundry, unloading the dishwasher, paying bills, checking email, etc. you know the drill.  But when you're at somebody else's house you aren't at your house to do anything, so you can just chill.  It was bliss. 

http://www.teacherspayteachers.com/Product/Animal-Classification-Habitat-Unit-With-Student-RecordingResponse-Booklets-1210136
Animal Group & Habitats Student Response Booklets

      And........ then I came home and did what only psycho teachers do - I sat on my laptop for two days straight making the unit that this blog post is featuring.  I didn't shower, I didn't leave the house, and I didn't get out of my pajamas.  It was ridiculous and totally unhealthy....but it's done and it's going to be awesome!  I can't wait to start my animals unit!  This is the first time I have gotten to teach animals, because the past 5 years I was in 1st grade and we didn't have any animal standards.  And now that I'm in 2nd grade, we do!! So I'm really excited, and I know my kids are going to love their animals and habitats booklet.

http://www.teacherspayteachers.com/Product/Animal-Classification-Habitat-Unit-With-Student-RecordingResponse-Booklets-1210136
Animal Habitat Posters with Fact Sheets

    My motivation for creating this unit was the fact that I sometimes feel like social studies and science gets pushed to the sideline and done "halfway" if you know what I mean.  In 2nd grade at my school, social studies and science is not actually graded, so it tends to have less emphasis put on assessment, but I always want to know what my kids have learned and I want them to have some record or hands-on proof that they have learned something in our thematic unit....hence the animals and habitats student booklets I created!  The two main standards for animals in our unit are on classifying animals into their different groups and learning about the different habitats and how they support life for the animals who live there. So I made a poster set for each animal group and habitat to help my students learn the different types (in addition to some great videos on the animal groups and habitats on United Streaming/Brain Pop, etc),  and then I made a booklet for students to respond to and record what they have learned!  My kids love having something to take home with them to show their families what they have learned in class as well, so it's a win win! I'm also working on some animal life cycle and food chain activities too....so Animal Unit Volume 2 will be on the way soon!   
     I hope this helps some of you guys who are getting ready to teach animals.  You can get this unit in my TPT store right now! Just click any of the pictures above to purchase.  And for those of you out there on your week off....Happy Spring Break!!!
         Beth
       

Saturday, January 11, 2014

Holiday Snowman Fun!

      Hey friends!  It is a very rainy and dreary Saturday, and the hubby is away, so I figured what better kind of a day to sit on the couch in my bathrobe and blog!  I just wish all this precipitation coming down was snow!!! :(  That's good ole South Carolina for you though...cold winter rain and NO snow! 
     So, now that the holidays are over I actually have some time to blog about them! Pretty sad, huh?  I sometimes only find time to blog about holiday related stuff AFTER the actual holiday has passed (Does anyone else have this issue??) and now nobody wants to read about the holidays, but maybe you can use the ideas for next year!!  This year was truly the year of the SNOWMAN! Everything this year ended up being snowman themed. I didn't really plan it that way, but it all came together and was a blast!!
 
       One thing that I had seen on the internet several different time is this neat concoction called "snow paint."  I've been wanting to try it forever, so I figured what better time to do it than for our holiday party.  Basically, snow paint is just shaving cream and Elmer's school glue mixed together.  But what's so cool about it is it dries puffy so it looks like actual snow!   All I did to make it was just squirt a big pile of shaving cream on a plastic plate and dump a regular sized bottle of Elmer's glue on top of it and mix it up with my finger.  I put one plate of snow paint in the middle of each table group and let the kids go to it!  I told them they could only use two fingers to put in the snow paint.  This made it MUCH easier for them to paint and made the project much less messy.  The couple of kids who chose not follow directions did not have nearly as good of a turnout on their picture. Because they used their whole hands, it smeared all over and made it look really messy and not like a snowman.  The ones that turned out the best were done with two fingers in a swirling motion. They turned out SOOOOOO cute!!!   I loved them!


SNOW PAINT RECIPE
  - one plastic plate for each table group
  - 1-2 cans shaving cream (get the cheap stuff - Barbasol)
  - 1 bottle of Elmer's school glue for each table group
  - Paper buttons, eyes, and noses cut out
   DIRECTIONS:   Squirt a big pile of shaving cream (entire diameter of plate and about 5 inches high or so) onto each plate to go at each table group. Pour a whole bottle of glue on top of each shaving cream pile.  Mix the shaving cream and glue on each plate together and put at each table.  After the kids are done snow painting, give them paper buttons, eyes, and noses to press into the snow while it is still wet.  It will dry and stick to the snowman. 

       Every year I also have my students make an ornament for their parents as a gift.  I've done the cinnamon and applesauce ornaments, the puzzle piece wreath picture ornament, the candy cane bead ornament, the snowman hand print ornament, and the list goes on.  This year I wanted a change, so I took a few ideas I found on Pinterest, tweaked them, and the result was a super cute snowman cotton ball ornament!   Back in November, I was shopping with my sister on Black Friday, and I found these plastic clear ball ornaments at Walmart.  I was so excited!! I love the look of the pretty clear ball ornaments and how versatile they are for craft projects, but they totally stink for kids because they are glass.  I cannot tell you how many glass ball ornaments that have gotten broken over the years before they even made it home!  So the plastic ones were absolutely perfect!  They were totally kid proof. :)

   MATERIALS:
        - Class set of plastic ball ornaments from Wal-Mart
        - 3 large bags of cotton balls
        - black fabric paint (the kind that dries puffy)
        - orange fabric paint (the kind that dries puffy)
        - ribbon for ornament hanger

  DIRECTIONS:
        - Give each student an ornament.
        - Show them how to remove the ornament top.
        - Let students stuff cotton balls into the glass ball until it is filled almost to the top.
        - Replace the ornament tops.
        - Paint eyes and mouths on the snowmen with black puff paint.
        - Paint a carrot nose on the snowmen with orange puff paint.
        - Write names on the backside of each students' ornament with a black sharpie.

  For our holiday party, we also played the snowman race game.  I did not come up with this idea, and I'm not sure who to attribute the idea to, but a friend told me about it, and it ended up being a blast!! I think it was probably one of the funniest games I've ever played with my kids. 
   All I did was put the kids into groups of 3.  I gave each group one roll of toilet paper, three paper buttons, a paper carrot nose, and a scarf (strip of fleece fabric fringed on the ends).  I let them choose which one of them would get to be the "snowman." When I said go, they used the toilet paper to wrap up their "snowman" friend and decorate him.  Whichever group got finished first was the winner.  After each round, I gave the groups another round of toilet paper, and we raced again and let them choose another student be the "snowman."  After 3 rounds, all 3 students in each group had gotten a chance to get wrapped up.  We reused the buttons, carrot nose, and scarf each time and just got a new roll of toilet paper for each round. The kids thought this game was hilarious and so did I!!  So much fun....
  
SNOWMAN GAME MATERIALS
  - 1 roll of toilet paper for each child in your class
  - strips of fleece fabric for "scarves" (enough for each group of 3 students to have 1 scarf)
  - paper buttons (3 buttons for each group of 3 students)
  - paper carrot nose (1 carrot for each group of 3 students)
 

Our day of snowman fun was a blast!!  I can't wait to come up with some fun new ideas for next year! Hope you all had a Happy New Year!!
    Beth